Plastisol heat curing is a crucial step in the screen printing process that ensures vibrant and durable prints. Proper temperature and time settings are essential to achieve the best results. In this article, we will discuss how to perfect plastisol heat curing for vibrant prints.
The first step in achieving vibrant prints through plastisol heat curing is to set the correct temperature. Plastisol ink requires a specific temperature range to cure properly and bond with the fabric. The ideal curing temperature for plastisol ink is typically between 320-350 degrees Fahrenheit. It is important to use a reliable and accurate temperature gauge to monitor the curing temperature throughout the process.
Once the correct temperature is set, the next step is to determine the optimal curing time. The curing time will vary depending on the thickness of the ink deposit, the type of fabric being used, and the specific characteristics of the plastisol ink. As a general rule of thumb, most plastisol inks require a curing time of 30-60 seconds at the recommended temperature range.
To ensure consistent and even curing, it is important to maintain a steady curing time for each print. This can be achieved by using a timer to monitor the curing process and ensure that each print receives the same amount of heat exposure. It is also important to avoid under-curing or over-curing the prints, as this can result in poor adhesion and durability.
In addition to temperature and time settings, proper ventilation is also essential during the plastisol heat curing process. Plastisol ink contains chemicals that can release harmful fumes when heated, so it is important to work in a well-ventilated area or use a fume extraction system to remove any potentially harmful vapors. This will help to protect both the printer and the environment from exposure to toxic fumes.
Another important factor to consider when perfecting plastisol heat curing is the type of curing equipment being used. There are several options available, including flash cure units, conveyor dryers, and heat presses. Each type of equipment has its own advantages and disadvantages, so it is important to choose the one that best suits your specific needs and budget.
In conclusion, achieving vibrant prints through plastisol heat curing requires careful attention to detail and adherence to proper temperature and time settings. By setting the correct temperature, monitoring the curing time, ensuring proper ventilation, and selecting the right curing equipment, you can achieve professional-quality prints that are vibrant, durable, and long-lasting. With practice and attention to detail, you can perfect the plastisol heat curing process and produce stunning prints that will impress your customers and stand the test of time.
When it comes to creating vibrant prints with plastisol ink, one of the key factors to consider is the mesh count of your screen and the type of emulsion you use. These two elements play a crucial role in determining the quality and vibrancy of your prints, so it’s important to choose the right options for your specific needs.
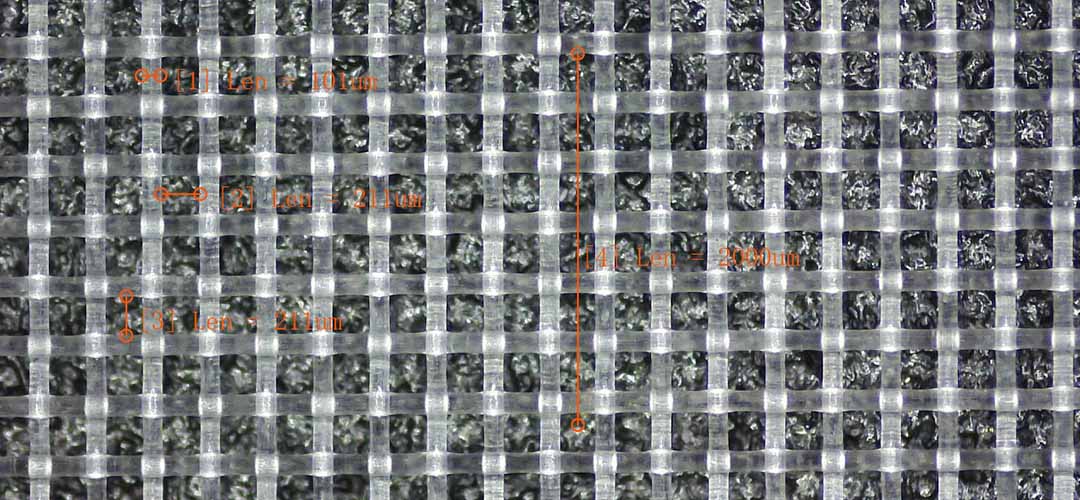
The mesh count of your screen refers to the number of threads per inch in the screen fabric. A higher mesh count means more threads per inch, resulting in a finer and tighter weave. This allows for more detail and sharper images in your prints. On the other hand, a lower mesh count has fewer threads per inch, which can result in a heavier ink deposit and less detail in your prints.
When choosing the right mesh count for your plastisol heat curing process, it’s important to consider the type of design you’re working with. For detailed designs or fine lines, a higher mesh count (such as 230 or 305) is recommended to ensure crisp and clear prints. For larger, more solid designs, a lower mesh count (such as 110 or 156) may be more suitable to allow for a heavier ink deposit and better coverage.
In addition to the mesh count, the type of emulsion you use also plays a significant role in the quality of your prints. Emulsion is a light-sensitive coating that is applied to the screen before exposing it to UV light to create the stencil for your design. There are two main types of emulsion: dual-cure and photopolymer.
Dual-cure emulsions are a popular choice for plastisol heat curing as they offer excellent durability and resistance to solvent-based inks. They are also known for their high resolution and sharp detail, making them ideal for intricate designs. Photopolymer emulsions, on the other hand, are more beginner-friendly and easier to work with, but may not offer the same level of detail and durability as dual-cure emulsions.
When choosing the right emulsion for your plastisol heat curing process, it’s important to consider the type of ink you’ll be using and the level of detail in your design. Dual-cure emulsions are recommended for high-quality, detailed prints with plastisol ink, while photopolymer emulsions are a good choice for simpler designs or beginners.
In conclusion, choosing the right mesh count and emulsion for your plastisol heat curing process is essential for achieving vibrant and high-quality prints. By selecting the appropriate options based on your design and ink type, you can ensure that your prints turn out sharp, detailed, and long-lasting. Experiment with different mesh counts and emulsions to find the perfect combination for your specific needs and create stunning prints that stand out.
Plastisol heat curing is a crucial step in the screen printing process that can make or break the final result of your prints. Achieving vibrant and consistent prints requires careful attention to detail and adherence to best practices. In this article, we will discuss some tips for perfecting plastisol heat curing to ensure that your prints come out looking their best every time.
One of the most important factors in achieving consistent results with plastisol heat curing is maintaining the correct temperature throughout the curing process. Plastisol ink requires a specific temperature range to properly cure and bond to the fabric. It is essential to use a reliable and accurate heat source, such as a conveyor dryer or flash cure unit, to ensure that the ink reaches the optimal curing temperature. Monitoring the temperature with a reliable thermometer is also crucial to prevent under or over curing.
In addition to maintaining the correct temperature, it is important to ensure that the ink is cured for the appropriate amount of time. Curing time can vary depending on the type of ink, the thickness of the print, and the type of fabric being used. It is essential to follow the manufacturer’s recommendations for curing time and to conduct test prints to determine the optimal curing time for your specific setup. Overcuring can cause the ink to become brittle and crack, while undercuring can result in poor adhesion and washability.
Proper airflow is another key factor in achieving consistent results with plastisol heat curing. Adequate airflow helps to remove solvents and moisture from the ink, allowing it to cure properly. Insufficient airflow can result in incomplete curing and poor adhesion. It is important to ensure that your curing unit has proper ventilation and to adjust the airflow settings as needed to achieve optimal curing conditions.
Using the correct mesh count and stencil thickness is also essential for achieving vibrant prints with plastisol ink. A higher mesh count and thinner stencil will allow for more ink to pass through, resulting in a brighter and more vibrant print. It is important to choose the appropriate mesh count and stencil thickness for the design and type of fabric being used to ensure that the ink is applied evenly and consistently.
Properly preheating the garment before printing can also help to improve the adhesion and durability of plastisol prints. Preheating the garment helps to remove moisture and wrinkles from the fabric, allowing the ink to bond more effectively. It is important to preheat the garment for the recommended amount of time and temperature to ensure optimal results.
In conclusion, achieving consistent and vibrant prints with plastisol ink requires attention to detail and adherence to best practices. By maintaining the correct temperature, curing time, airflow, mesh count, stencil thickness, and preheating the garment, you can ensure that your prints come out looking their best every time. Following these tips will help you perfect plastisol heat curing and achieve professional results with your screen prints.
Pre: Achieve Consistent Results with Nylon Mesh 200 Micron
Next: Understanding the Functionality of a 4-Color Manual Silk Screen Printer

MACROKUN has established long-term and stable cooperative relations with many transportation companies such as China Post, DHL, FEDEX, USPS, UPS, etc. Of course, MACROKUN can also provide air and sea transportation. The powerful logistics system enables all MACROKUN'S Printing Mesh, Filter Mesh and Filter Bags and so on to be easily and efficiently transported to any place. For quotes and inquiries, please email our sales team.
